Copper CRM: How to update custom multi-select fields via Zapier
Have you got a multi-select custom field in Copper, and you are struggling to update it via Zapier? That’s because Zapier’s integration with Copper doesn’t support that behaviour. That’s right - it’s not currently possible, at least not the easy way.
So how are you going to get your Copper data updating automatically then? This post will tell you how. Maybe you have forms that your customers are filling out, which contain multi-select options which you want to see in Copper. Or perhaps you have multi-select fields in Airtable which you want to be in Copper as well. Read on to find out how you can do this!
(Or if you’d prefer us to help you face to face, check out our Zapier support package)
The recipe
Here’s the steps that we’re going to follow to get you to a Zapier-automated utopia:
Set up your zap with a trigger and a Copper action step
Get your custom field definitions from the Copper API
Hook up the Copper API to Zapier (via webhooks)
Add a code step to format your multi-select data
The main idea is that we’ll use the built-in Zapier integration with Copper to do most of the heavy lifting. And when the built-in integration can’t do any more, we’ll finish the job with webhooks, interfacing directly with the Copper API.
Step 1: Set up your zap
If you’ve already got a zap with a Copper step ready to go, skip to the next section. Otherwise, let’s get everything set up.
You’ll need some data that you’d like to get into Copper, for example it could be a Submittable form that your customers fill out. Make sure you’ve got at least one form entry, even if it’s just test data. Head over to Copper and set up your fields to take the data. Since you’re reading this particular blog, it will probably involve having at least one custom multi-select field.
Go over to Zapier and create a new zap. Pick a trigger that represents that data you want to get into Copper. We’ll stick with the previous example of a Submittable form trigger. Once your trigger is tested, add an action step, with Copper as the App. Choose one of the “Create/Update…” options as the Action Event. FYI, for this tutorial, I’m going to be working through Create/Update Person.
Wire all your data from the trigger into the Copper action step. At this point you might be wondering, where is that custom multi-select field that I created in Copper? Why isn’t it showing up here in Zapier? We’ll fix that later, so don’t worry for now.
Test the action step, and make sure that your test has showed up in Copper. You’re done with the easy part - that’s everything that Zapier can do with the built in Copper integration.
Step 2: Get your custom field definitions from the Copper API
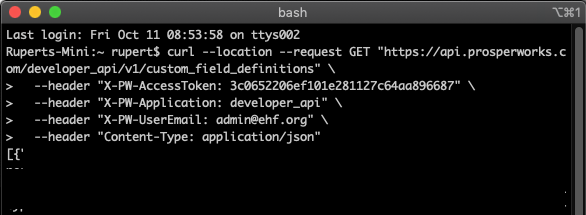
Now it’s time to get the Copper API up and running. First, let’s go over to Copper’s API documentation. Try this page: List Custom Field definitions. Find the example that looks like this:

That text starting with curl and ending with json” is your query text. Copy the query to somewhere you can edit it - a plain text document might be handy (make sure it’s plain text, as rich text might cause you problems later).
Now we’ll customise the query with your information. Sign in to Copper, head to Settings, then click on Integrations -> API keys. Click the button that says “Generate API key”, and give it a label that makes sense to you. Copy the API key into your query, replacing the YOUR_TOKEN_HERE text. Replace the YOUR_EMAIL_HERE text too, making sure it’s the same email address that is registered to your Copper account.
You should have something that looks like this:

We’re ready to test! Open up your favourite terminal or command line tool. This might be Terminal on Mac, or Command Prompt on Windows (note this will only work if you have Windows 10 or later). If you don’t have a terminal tool, or you can’t get it working, never fear! There is an alternative in step 8 of this Copper documentation which you can work through.
Assuming that you are going ahead your terminal tool, paste in your query text, and press enter. Your results will look something like this:
If it worked, congratulations! Your Copper API integration is working successfully. If not, try going back through the previous steps.
After you pasted in your query text to the terminal, you would have received a response. It’ll be a big dump of text, where the first two characters are [{ and the last two characters are }]. Copy everything between those characters, INCLUDING the first [{ and the last ]}. Head over to http://json.parser.online.fr/ and paste in your results.
You should see a nicely visualised list of all your custom fields in copper, with IDs, names, data types etc. Go through and find the name of the first multi-select field that you want to update. Note down the ID number for the custom field, and the ID numbers for the different options.

Now that you’ve got the IDs that you need, you’re ready for the next step!
Step 3: Hook up the Copper API to Zapier (via webhooks)
Open up Zapier and find your Copper zap. Add in another action step after the Copper action step. Make it a webhook with a custom request, as shown below.

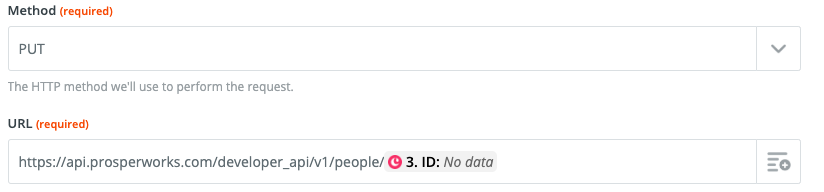
Now to customise the Webhook step. Choose PUT as the Method. Next, we’ll need to find the correct URL, which will mean looking at the Copper API documentation again. Here’s the documentation for updating a Person record to get you started - if it’s something else you want to update, find that documentation. On the documentation page, you’ll find the URL you need. Copy it into the URL field in your Zapier webhook action step.

The URL you need from the Copper API documentation is highlighted in this image.
You’ll need to customise the URL too, replacing the text with an actual Person ID from Copper. In Zapier, you should have a previous Copper action step which you can pull through the ID from, like so:
Next, we’ll be adding in something to the Data field. Let’s start with a simple test, which just updates Copper with one of the multi-select options. Remember those IDs you noted down before, for your custom multi-select field? Here’s where we’ll be using them. See below for where to insert the IDs, shown with XXXXXX:
{
  "custom_fields": [
    {
      "custom_field_definition_id": XXXXXX, //insert your custom field ID here
      "value":[XXXXXX] //insert the ID for your first multi-select option
    }
  ]
}
Once you’ve customised this text with the IDs you want, paste it in to the Data field in your zap.
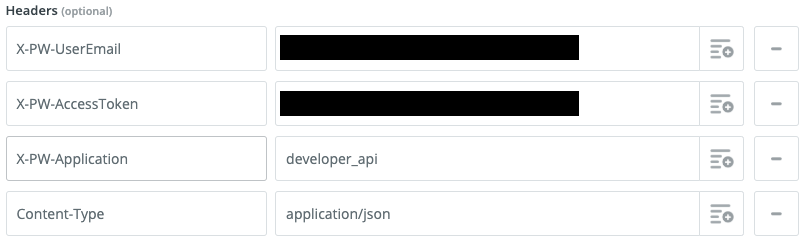
The last thing we’ll do before testing this webhook step is to set the Headers. Set them up as shown:
Test the step and see if it works. Hopefully you got a nice response from Zapier, and if you head over to Copper CRM and refresh the page of the Person (or other entity) that you’re updating, you’ll see the changes have taken effect over there too.
There’s one last thing to do.
Step 4: Add a code step to format your multi select data
Now that we know we have a mechanism to reliably update your custom multi-select field, now we have to get it updating with real data from your trigger step.
So in our zap, we’re going to add a code step IN BETWEEN the Copper step and the webhook step. This code step will take an input from your trigger, and spit out some nicely formatted text that your webhook can read as multi-select options.
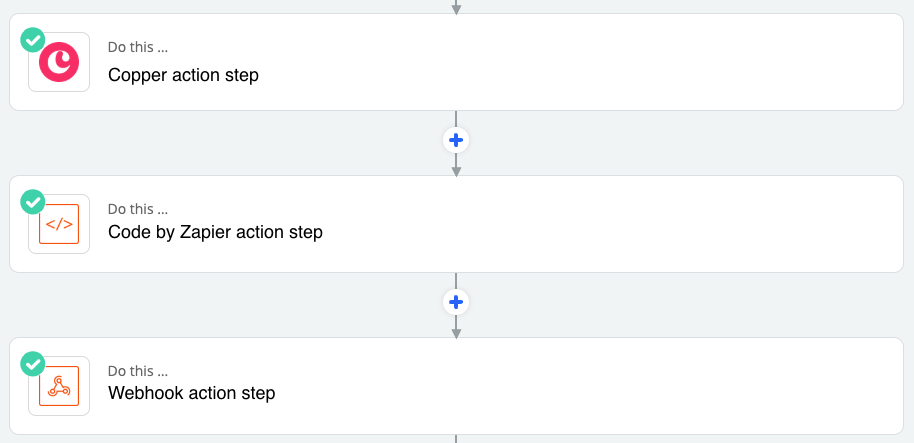
This the order of action steps that you want in your zap.
So go ahead and create that Code by Zapier action step, and choose “Run Javascript”. Under Input Data, pipe in the field from your trigger that you want converted into multi select options. The example below shows a question from a Submittable form being piped in.

Let’s write some code. First, paste this in to the Code area:
var multiSelectQuestion = inputData.multiSelectQuestion;
var multiSelectValues = [];
Remember those multi-select option IDs - where we used just one previously? Now we’ll use all of them. Add in one of these for every different option on your multi-select:
if (multiSelectQuestion.includes("Text of the option that you're looking for")){
  multiSelectValues.push(XXXXXX); //insert your option ID here
}
You might end up with 5 or 6 of these clauses, one for each option. Finally, assign an output so we can pipe the multi-select values through to the next step in your zap:
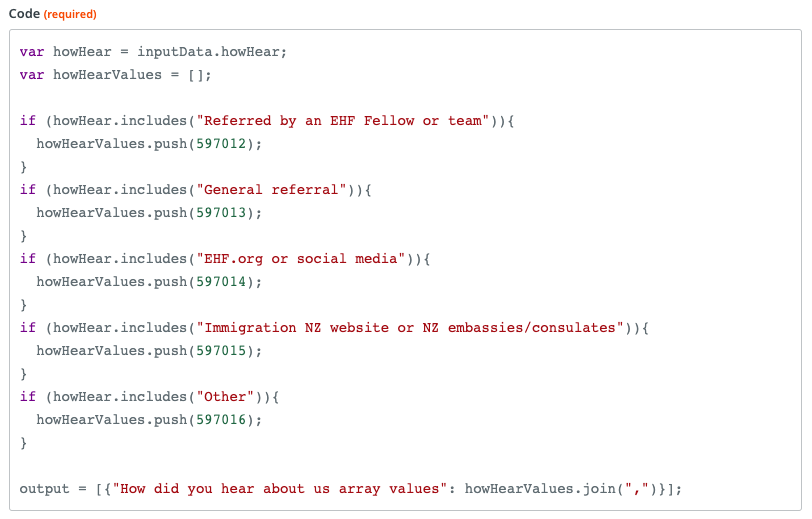
output = [{"Multi-select values": multiSelectValues.join(",")}];After all that copying and pasting, your code will look something like this. Note that I’ve used different variable names, so it won’t be exactly the same.
It’s time to test the code zap and make sure it works - fingers crossed! Once you’ve got everything working as it should, you should see an output that includes all the multi-select options in your trigger data, but formatted as a single line of text. Perfect!
Finally, edit the following webhook action step, to pipe in the output from the code step. You’ll need to replace the multi-select option ID that you had with this new data. See the picture below for where to do it:

Re-test the webhook step in Zapier to make sure it works, then head over to Copper to check it’s showing up correctly (be sure to refresh the page if you’re not seeing anything). If it’s all looking good, you can turn your zap on.
That’s it! You’re done!
Congratulations on making it this far! Maybe you found this reasonably easy, but you want to ask us a few more Zapier questions. Or maybe you got stuck, and you’d like some help. Either way, take a look at the Zapier support options that we provide.
Written by Rupert from Optimi