6 Steps to Automated Membership Subscriptions for your Community
How we created a robust multi-tier subscription model on a shoestring
One of our jobs at Optimi is to run systems and processes for Enspiral. Enspiral is a collaborative network of people, groups and ventures that helps people to do meaningful work. The operations behind the Enspiral network is a beautiful and complex organism to wrangle. Its membership base of ca. 160+ individuals and how their subscriptions are handled continually evolves. With every turn and twist in the network’s evolution, we’re there with creative and inexpensive ways to back it up with technical support. Enspiral after all is on a social mission to help people do more work on the stuff that matters, as I’m sure many other social enterprises would want to do. And to enable this social mission, we need to keep the finances spent on running the machine as lean as possible.
Enspiral is financially supported by membership subscriptions. One project we did with Enspiral was around refreshing their subscription system. We needed to convert the subscription process from manually sending invoices once per year, to a streamlined, automated process that provided an awesome customer experience.
Subscription requirements
Our technical brief had the following requirements:
Customer Portal — so contributors can log into an area to manage their own subscriptions
Different pricing tiers for different subscription levels
Weekly, monthly or annual payment frequencies
No coding required to keep the system running and up-to-date
Lowest budget possible
Good integration with existing Enspiral systems (Zapier, Airtable and Xero)
Can use Stripe for payment transactions
Multi-currencies — and specifically New Zealand dollars, as Enspiral is based in NZ.
In our research, we couldn’t find an affordable off-the-shelf tool to satisfy all of our requirements. So we knew that we’d have to configure our own system using a number of different apps — and frankly, our Optimi brains really geeked out on this prospect, as solving problems with automations and integrations is one of our specialties.
The best-fit Subscription Billing service we could find was Chargebee. Chargebee ticked most of the boxes: customer portal, endless subscription products, integrates with Zapier and Stripe, an offer for new businesses a $0 plan for the first $50k of revenue, and reasonably priced after that.
With these boxes ticked we now needed to meet the rest of our requirements by connecting other apps to Chargebee: Chargebee – Stripe – Airtable – Xero. Chargebee would handle subscriptions and the customer experience, Stripe would handle subscription payments, Airtable would store data on members and their subscriptions, and Xero would hold financial records for tax compliance.

One of the key goals for this system was to make the ongoing Bookkeeping service of these subscriptions fast and simple.
TL;DR Spoiler Alert: it works and takes less than 1 minute to reconcile a bundle of Stripe payment transactions in Xero!
The Basic Setup
Here we have the 6 key steps to creating your own automated subscription system.
*Note: there’s some hidden detail and challenges we found in doing this for our particular organisation. You can dig deeper in our Challenges section.
Step One: Configure Chargebee with the right subscriptions
Go into chargebee and set up all your subscription options and costs
Each subscription has a unique URL, which you can use to populate hyperlink buttons on your website (see Enspiral’s Subscription options below)

Step Two: Automation: Chargebee subscription -> Airtable.
Connects your existing users in your database to the subscriptions coming in
Zapier: make a new zap with the trigger of New Chargebee Subscription
Airtable: Find the right person record (search by email that comes from Chargebee)
Airtable: Create a subscription record which is connected to the person record
Step Three: Automation: Create a matching invoice in Xero from the Chargebee Charge
This creates a sales invoice in your Xero accounting software so that the subscriptions can integrate with the rest of your budget in one place.
Zapier: make a new zap with the trigger of New Chargebee Charge
Airtable: Find the right person record (search by email that comes from the Chargebee charge)
Airtable: Find the right subscription record to match
Xero: Create an Invoice with all of the correct info from Airtable and the Chargebee Charge
Step Four: Automation: when someone has paid via Stripe, create a payment record in Airtable to reconcile against the Xero Invoice
This step creates a table of payments in a spreadsheet that we’ll use later on to reconcile the incoming bank payment in Xero.
Zapier: make a new zap with the trigger of New Stripe Charge
Airtable: create a payment record in Airtable
Step Five: Automation: Use a new Invoice in Xero as a trigger for updating the payment record created in step four
This updates the payment record with the newly created Xero invoice number, so we can easily refer to them when we reconcile.
Zapier: make a new zap with the trigger of New Sales Invoice in Xero
Zapier Filter: use a filter step to only continue with invoices associated with Stripe payments
Airtable: find the payment record created in step 4
Airtable: Update the payment record with the associated Xero Invoice number
Step Six: Set up manual reconciliation process for Xero invoices against the payments shown in Airtable
Here’s the incoming bank payment feed in Xero with a bundle of Stripe payments all as one transaction:
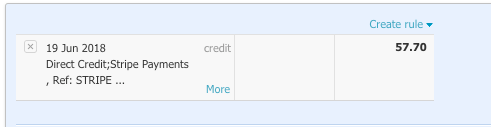
In our Airtable view, we Group the payment records according to a Xero Sorting Date and it gives us the matching sum of $57.70:

Boom! Now you can see that the Sum of $57.70 on the right matches the bundled transaction in Xero of $57.70.
Now all the bookkeeper has to use is the “Find and Match” with the above Xero Invoice codes (e.g. “INV-1764”) to find all the relevant Sales Invoices to Reconcile against, thereby reducing a potentially lengthy and painful task into less than a minute.
Done.That’s the Basic Setup. Carry on if you want to dig deeper in our Challenges section.
Challenges we faced
Challenge: get the right timezone
Stripe bundles all transactions received within a 24-hour UTC day and then sends them together as a single payment to your bank. Knowing what individual payments to group together on the receiving end is a challenge.
Since we’re based in New Zealand, we had the additional complication of knowing what “day” Stripe used to bundle the payments together.
Here’s how we tackled this problem:
1. Add the UTC Stripe transaction time and your timezone to your payments database
In our Payment Records database in Airtable we pulled in both the UTC and New Zealand (NZ) transaction time via Zapier. We worked out that it takes four working weekdays for the funds to hit our bank in NZ, plus one additional day for the bankfeed to appear in our Xero account. (see Stripe’s payout schedule according to where you are…)
2. Create a new Formula Column for your “Xero Sorting Date”
In Airtable, we created a “Xero Sorting Date” column, which is a formula based on the UTC and NZ transaction times zapped in from the Stripe payment. Take a look:

We found that the “WORKDAY” part of the formula ensures that these dates appear on a work day. As such, if the transaction date ends up being a Sat or Sun after adding 5 days, this part of the formula bumps it to Monday. The “NZ” part of the formula also takes into account New Zealand Holidays, and it mostly works, but we’ve found it still messes up from time to time!
3. Create an additional Formatted Xero Date Column
An additional trick here is that you can’t sort dates that are created by a formula. As such, we created an additional column that formats the date in an order that can be sorted correctly:

In Airtable, we can then easily group the payments together by this Sorting Xero Date Column with A–Z.
Challenge: Stripe bundling from other business revenue sources
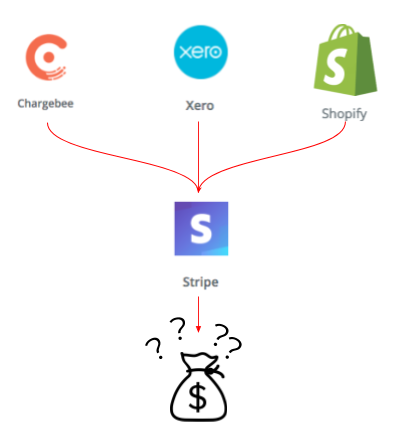
Stripe is a fantastic tool for securely collecting payments. However, Stripe is indiscriminate about where these payments are made and bundles all funds received on a particular day together, no matter the source, which is a challenge! As such, we needed a way to record the source of the payment within our payments table along with the other info.
Here’s how we did it:
1. Get a Unique Description from the Stripe Payment
Within our Zap triggered by a new Stripe Payment, we found that the Stripe’s payment description for all of the Chargebee charges started with “Chargebee customer:Joe Bloggs”. This was also true from our other source (Shopify… in this case “Contribute XYZ”). As such we added a step here to extract the first word of the description.
2. Add a Spreadsheet Style Formula to create the payment type
We used the unique first word extracted from the previous step in a nested “IF” statement formula to generate our unique payment type, which could then be added to the payments record table, as follows:

If the description did not include either “Chargebee” or “Contribute”, then we knew the only Stripe payment option left was a payment via Xero Invoice. You could easily use more nested “IF” statements to create more options to accommodate wherever you use Stripe too.
Challenge: Sales Tax
Another challenge we faced was concerning the transaction amount coming through from Stripe: how do we know if the payment amount should include GST or not?
(Note: GST = Goods and Services Tax in New Zealand)
Whether tax should be applied for the customer is all handled clearly within Chargebee. However, for our automations to accurately create a Sales Invoice in Xero, we needed a way to automatically determine whether GST was applicable or not as well.
Here’s how:
1. Zapier: Create a formula step in your automation that determines the tax code.
The simple accounting rule for us in New Zealand is: if the customer is in NZ, then the amount includes GST, otherwise the amount is Zero-rated. Both of the automation triggers from Chargebee: 1) new subscription; and 2) new Chargebee charge includes data for the billing address country.
As we also use Xero for our accounting, we needed to use the particular language for the tax code type. Xero has published a list of their tax codes, depending on which country you’re in — take a look here.
For NZ, “GST”=”OUTPUT2” and “Zero-rated”=”ZERORATED”. As such, we used the IF formula:
IF(=”NZ”,”OUTPUT2”,”ZERORATED”)
2. Zapier: Create Xero Invoice — use the output of the above tax code step to tell what type of tax to input into the Xero invoice.
In the automation step to Create a new Sales Invoice, for the Line Tax Type = Use a Custom Value (advanced). Then select your previous step that generated the tax-code type (in our case, the output will be either: OUTPUT2, or ZERORATED.
3. Xero Sales Invoice Default Tax Setting
One final fish hook of ensuring the tax amount is entered accurately into a new Sales Invoice is to double-check the default tax setting in Xero. We took advantage of this by selecting the default that all new Sales Invoices to be Tax Inclusive, as opposed to Tax Exclusive. In this way, whether the line item had a GST code or a Zero code, the total of the invoice would match the amount coming through from Stripe.
Bonus tip: Create a Failsafe Step in your Zapier Automations
One thing’s for certain with automations is that they’re prone to break! Zapier has certainly improved things on their end by having the option to auto-replay zaps that don’t work. But if you don’t have a paid plan or you just want to act on these hiccups asap, then a simple way to help you out is to always include a failsafe pair of steps within your automations.
Here’s how we do it:
1. Create a filter step that determines if a previous step broke
We used the “Only continue if…” filter and then picked a step that might break the whole zap. In our case it was the “Find Person” in our database step (e.g. {Step 2}), which can be prone to break if someone enters a new email or name variation we haven’t recorded for them.

2. Send a notification to your comms channel
We use Slack for managing moment-to-moment comms and notifications in our Team. And so we send a Channel alert to our “Notifications-do-it” channel in Slack, which includes a link to the history of this particular Zap along with the unique info that was a problem.

This step could easily take the form of an automated email, ticket in Trello/Asana, chatbot or whatever notifications tool you use. Whatever the case, this pair of steps acts as a failsafe so that you can keep your workflow humming, even when something goes wrong.
Rounding up
So there we have it: six steps to create your own automated subscription system for your community and some of the challenges. If you have systems to automate or questions about this setup, find out more about our Zapier support and coaching!
~ Charley at Optimi
Also be sure to check out the various tools we use here, and our community: Enspiral | More people working on stuff that matters
Tools:
Airtable | Looks like a Spreadsheet, Acts like a database
Chargebee | Smart Subscription Billing
Stripe | Online payment processing for internet businesses